PS3xport - является утилитой под Линукс и Windows для редактирования архивов PS3, создаваемых при её резервном копировании. Позволяет создавать полностью рабочую резервную копию с нуля, а также извлекать/переименовывать/удалять или добавлять новые файлы в существующую резервную копию.
Немного о файлах:
Чтобы сделать резервное копирование в XMB перейдите в Настройки системы -> Утилита резервного копирования. Вам понадобится флешка/HDD форматированные в FAT32. Будут созданы папки PS3, PS3/EXPORT и папка-дата в момент создания резерва, например X:/PS3/EXPORT/201412242359
В этой папке будут лежать следующие файлы:
archive.dat - это "Index file" archive_00.dat, archive_01.dat, archive_02.dat, др.. - это "Data files" archive2.dat - это "Index file" с файлами, защищённых от копирования archive2_00.dat, archive2_01.dat, archive2_02.dat, др.. - это "Data files" защищённых от копирования Как видите, существуют два типа файлов - Index и Data. Index файлы содержат списки файлов, находящихся в Data файлах. Data файлы только содержат эти файлы. Также существуют два типа хранящихся файлов - обычные и защищённые от копирования. Те что называют "защищёнными от копирования" представляют собой ключи к играм/DLC PSN в /dev_hdd0/home/000000XY/exdata , защищённые от копирования сохранёнки игр и тому подобное. Такие файлы энкриптованы с device ID, так что на другой PS3 они не восстановятся, т.к. device ID для каждой PS3 уникален. Однако, внутри есть OpenPSID, говорящий о том с какой консоли был создан резерв. Без правильного PSID в таком резерве, восстанавливая его на другой PS3 Вы увидите сообщение о том, что резерв был создан на другой консоле.
Использование:
Код
Usage: ps3xport command [argument ...] [command ...] Commands : SetKeysFile filename: Задать путь до keys.conf файла (default: keys.conf) SetDeviceID (HEX|filename): Задать DeviceID для декрипта archive2.dat SetPSID (HEX|filename): Задать OpenPSID для создания нового резерва ExtractPSID backup_dir output: Извлечь OpenPSID из папки с резервом ReadIndex archive.dat: Parse the specified index file and print info ReadData archive_XX.dat: Инфа о Data файлах Decrypt archive[_XX].dat decrypted.dat: Декрипт указанного .dat файла Dump backup_dir destination_dir: Извлечь весь резерв в указанную папку ExtractFile backup_dir filename destination: Извлечь определённый файл из резерва ExtractPath backup_dir path destination_dir: Извлечь определённую папку с содержимым из резерва DeleteFile backup_dir filename: Удалить определённый файл из резерва DeletePath backup_dir path: Удалить определённую папку с содержимым из резерва DeleteProtected backup_dir Удалить защищённые файлы из резерва Add backup_dir directory: Добавить указанную папку с содержимым в резерв AddProtected backup_dir directory: Добавить указанную папку с содержимым в резерв с защищёнными файлами CreateBackup backup_dir protected_content content Создать из всего новый резерв. ВНИМАТЕЛЬНЕЕ! - сначала защищённый, затем простой контент Задайте content path на '-'
Чтобы прога работала, её нужны PS3 keys. Можно задать путь к keys.conf с помощью SetKeysFile. Если путь не задан - прога сначала поищет в папке с собой, затем в подпапке, которая присвоена (если присвоена) значению PS3_KEYS_PATH и в папке .ps3 , что лежит в папке ~/ (для линукса). keys.conf должен содержать ключ типа 'sc' с revision 3.
Device ID (или IDP , IDPS) задаётся командой SetDeviceID. При этом можно написать его в командной строке вручную или указать путь к файлу, содержащий Device ID в 16тиричном виде. То же самое и для случая с OpenPSID и командой SetPSID.
Чтобы найти OpenPSID Вашей консоли, используйте команду ExtractPSID, указав папку с резервом и конечный файл куда записать PSID. Будет представлен в бинарном виде. Найти же Device ID на консоле с OFW пока что невозможно. На CFW он написан в MultiMan'е, а на консолях с Cobra ODE есть Unofficial Cobra ODE IDPS Dumper.
Заметьте, что все надстройки непостоянны, так что чтобы прога их использовала, они должны предшествовать другой команде. Смотрите примеры для большего понимания.
Команды ReadIndex и ReadData нужны для того, чтобы вывести информацию об Index (archive.dat или archive2.dat) и Data (archive_XX.dat или archive2_XX.dat) файлах соответственно. Команда ReadIndex выведет список всех папок и файлов в Index файлах с полными путями, размерами, правами доступа и др., а также такие файлы, как unique ID резерва, PSID, размер защищённых файлов и др. Команда ReadData выведет unique ID резерва, Index файлов Data (должны быть идентичны) и проверит, что файлы не повреждены и не портят весь Data файл. Заметьте, что для защищённых файлов (archive2[_XX].dat) нужно указать DeviceID.
Команда Decrypt полезна для дебага файла или лучшего понимания их формата. Она берёт файл .dat и декриптует его, используя PS3 static key для archive.dat и Device ID для archive2.dat соответственно.
Команда Dump извлечёт всё содержимое резерва в указанную Вами папку. Опять же, Вы должны будете указать Device ID для извлечения защищённых файлов. Если Вы хотите извлечь незащищённые, возможно Вам лучше использовать команду ExtractFile с указанием этого определённого файла. Для ещё большей свободы есть команда ExtractPath - извлечёт указанную папку с содержимым.
Чтобы что-то удалить из резерва, используйте команды DeleteFile или DeletePath. На самом же деле, указанные Вами файлы не удаляются из резерва, а переименовываются в /dev_hdd0/tmp/null , т.к. для удаления нужно перестраивать весь резерв.
Эффект команды DeleteProtected такой: из файла archive.dat и его archive_XX.dat удалится папка exdata и её содержимое , а archive2.dat с archive2_XX.dat станут "пустыми", но размеры и индексы резерва будут совпадать ДО и ПОСЛЕ применения этой команды. Вот что есть удаление защищённого контента . С этой командой можно достичь избавления предупреждения о том, что некоторые файлы не могут быть восстановлены при восстановлении резерва на другой PS3.
Чтобы что-то добавить в резерв, пользуйтесь командами Add (для archive.dat и archive_XX.dat) или AddProtected* (для archive2.dat и archive2_XX.dat). Они рекурсивно добавят контент в резерв.
Собирать резерв с нуля командой CreateBackup с указанием папки с создаваемым резервом, папки с защищённым контентом и папки с обычным контентом - новый резерв будет содержать такую же структуру файлов как и оригинальный, за исключением порядка расположения файлов. В оригинальной инструкции написано наоборот, что сначала указывать папку с обычным контентом, а затем папку с защищённым - возможно это так не с проста, т.к. команды Add, AddProtected и DeleteProtected оказывают действия на конкретные файлы.
* Инструкция для пересборки с правами доступа - пригодится и для приставок без эмулятора привода (для таковых нельзя спасти ачивки кроме как чреватым баном официальным способом - через синхронизацию с PSN)
Список незащищённых файлов: ./ps3xport ReadIndex PS3/EXPORT/201412242359/archive.dat
Список защищённых файлов: ./ps3xport SetDeviceID idp.bin ReadIndex PS3/EXPORT/201412242359/archive2.dat
Вывести список всех файлов в резерве в текстовый файл filelist.txt: ./ps3xport SetDeviceID idp.bin ReadIndex PS3/EXPORT/201412242359/archive.dat ReadIndex PS3/EXPORT/201412242359/archive2.dat > filelist.txt
Создать резерв без защищённого контента: ./ps3xport SetPSID psid.bin CreateBackup PS3/EXPORT/MYBACKUP my_custom_dev_hdd0 -
Добавить файлы в резерв: ./ps3xport Add PS3/EXPORT/MYBACKUP dev_flash2
Также можно делать много операций одной командой: ./ps3xport ExtractPSID PS3/EXPORT/201412242359/ psid.bin SetPSID psid.bin ExtractPath PS3/EXPORT/201412242359/ /dev_flash2 output_dev_flash2 SetDeviceID idp.bin CreateBackup PS3/EXPORT/MYBACKUP my_protected_data my_custom_dev_hdd0 Add PS3/EXPORT/MYBACKUP output_dev_flash2 DeleteProtected PS3/EXPORT/201412242359
* PS3Xport 0.2.1 с поддержкой разбивки создаваемого резерва на части по 4Гб
* PS3Xport 0.2.1зеркало * PS3XPORT Mod 0.3 - Только у нас! ps3xport предоставляющий права r/w (777) на все папки и файлы в /dev_hdd0! - теперь не только у нас, а всё "официально", прямо в исходниках.
So, be online here as long as you can. And be prepared for TeamViewer session.
Hahaha, it is funny, and sad, but it would not be possible to transfer files live because internet in Venezuela is sloooowwwww... It takes 1 day to download 2gb... Is almost like dial-up, look: https://www.speedtest.net/my-result/5789978730
But do not worry, as I think I will be available to create the backup with the files from the BLES version. Well, I think that is achievable if the installed files are just copied from the disc with no further configuration. What do you think?
Also, the version that is mine because I bought it is the BLUS31156; it is the disc that is damaged. The BLES01807 is a Jack Sparrow version I downloaded because I have not a BR drive to get the files from a BR disc in a computer
Anyway, if you feel comfortable uploading the files, I think that the best option is MEGA.
I will be available all this day long, as a doctor send me home back from work because a strong pain in my neck hahaha.
Also you'll need to download and install Also's ps3tools if you are still not. And the program with which it is possible to inject the files over 4Gb - PeXploit
After everything is downloaded and prepared, do next: 0. First of all, sync your achievments on your PSN account if you care of them; 1. Extract UP1004-BLUS31156_00-GTAVTITLEUPDATER-A0126-V0100-PE.pkg patch. The BLUS31156 directory appears; 2. Unzip BLUS31156_install.zip. Place next files to the BLUS31156_install/USRDIR/ directory appeared (Here I assume that you already have these files): common.rpf part0.rpf part1.rpf part2.rpf part3.rpf part4.rpf - if you have no these files - you can download any torrent with these files whenever the GameID is BLUS31156 or BLES01807 3. At this moment you have these directories prepared: BLUS31156 and BLUS31156_install. It is the time to launch PeXploit. a) Check this: "Extracted pkg". May uncheck this: "Backup original" - better to copy your backup to some another place by yourself; b) Choose "Select backup" - set the destination to the folder which contains your backup files; c) Choose "Select PKG(s)" - with the checked "Extracted pkg" feature, using "Select PKG(s)" feature you need to set the folder to the files which are needed to be injected. They will be in /dev_hdd0/game/ directory by default. So, you need to set the BLUS31156 folder first, and second the BLUS31156_install. d) That's all. Now, push the "Patch and go!" button. Now, you can go eat, shit, smoke, drink tea, etc,etc,etc.. e) When it's finished, the enlarged files will be in place where is the folder you set when choosing "Select backup". Copy files.dat to the certain place to USB stick (files.bak are not needed) ё) Restore your backup on PS3; sync your achievmnets. f) Launch your downloaded from PSN BLUS31156. Write here if that worked. ------------------------------------------------------
ЦитатаMonstreboss
we "just" need the structure of these files to make it works ? It's the same way for other games or only GTA V ?
No. I thought you are for GTAV too - understood word "we" like you and montcer9012 are interested in GTAV only. If you want to install pkgs to your PS3 - please, read the PeXploit tutorials. Sorry, but I can't provide them to you, so search by yourself. You have to ontain for yourself which games can be installed to your 4.81 FW. PS4 CUH-1108A OFW 5.05 + VR CUH-ZVR2 PS3 SuperSlim CECH-4208a OFW v4.50 Cobra ODE PS2 SCPH-77008a SLIM чиповка; припаян YPbPr - компонент PS2 SCPH-55004 FAT чиповка + orig SCPH-10281 Network Adapter SATA mod
@archicharmer nope you misurderstood "we" was just people in general ^^ (I don't want GTA V I already have it ) I was just asking if it was the same process
What's funny in my ideas? You know, I can screw that all and you go find the help from another people.
No! I am very sorry for the misunderstanding; I wasnn't talking about your ideas, I was talking about ha huge data transfer with my shitty internet connection. I have some pals in Russia that have helped me a lot to play online games, and they are able to download a 10gb game in just a few minutes, while it took me DAYS. That's why I also say that it is sad! It is very sad to have my internet connection Your ideas are outstanding because you know what you are talking about and that is more than enough for me!
Also, I am making all the arrangements, will let you know the results later!
Thanks pal!
Добавлено (12 Ноя 2016, 05:45) --------------------------------------------- Well, I follow your instructions, but PexPloit won't even start injecting the files because it says that the file icon0 already exist then the program crash etc etc etc. No luck.
As PexPloit didn't worked for me, I decided to inject the files my self with v0.3 via the ADD command. No luck as the PS3 won't restore the resulting files; it says that the data could not be restored.
So, I created my very own backup from an existing backup. I mean: 1. I format my PS3 2. I restored some data, like old salves and sync trophies 3. I backed up my just format PS3 4. Dump the files with ps3xport 5. Place the folder BLUS31156_install in dev_hdd0\game\ Aforementioned looked like this: https://pastebin.com/3TWEnmnd 6. BackUp creation 7. BackUp restoration
AAANNNDDDD
...
IT WORKED! Well, kinda, because if I go to GAME DATA UTILITY it shows the game installation size, but if I start the game, it is like none of those files were there so the game starts the installation back from 0mb
I think that the game starts the installation because there should be a files protection system or something like that in order to avoid users from mod the game. What do you think?
Добавлено (12 Ноя 2016, 05:52) --------------------------------------------- Also, how do you find the updates, and where should it be placed? I would LOVE to download the updates so I can try to restore them everytime I create a backup. It is very annoy to download 2.6gb everytime I format my PS3. Seriously, my country banbdwitch sucks hard
Добавлено (12 Ноя 2016, 06:48) --------------------------------------------- Hey, archicharmer, could you please install the game plus all the updates, then create a files structure like the one I share in PasteBin? I want to look which files are inside those folders. I think you may already know, but just in case, you can print the files heritage from Windows CMD with: dir /s /b > dir.txt
Well, I follow your instructions, but PexPloit won't even start injecting the files because it says that the file icon0 already exist then the program crash etc etc etc. No luck.
And you gave up at once?!?!?! I told you somewhere to delete the GTA5 game data FIRST before injecting the files, didn't I?... Oh. You may restore your previous backup if you care about the files which it has (did you copy it before all these operations?....), delete the GTA5 game data from XMB, made a backup and inject the files! So, I recommend you to go this way and use your previous backup and PeXploit.
Цитатаmontcer9012
Aforementioned looked like this: https://pastebin.com/3TWEnmnd ............. if I start the game, it is like none of those files were there so the game starts the installation back from 0mb
Open your file list on pastebin.com . Didn't you see that there is only one .rpf file - part0.rpf ? Where are the others?!? That's why the game is attempting to re-copy the files from the beginning, not because some protection things. And where is the patch - BLUS31156?!?..
That's why the game is attempting to re-copy the files from the beginning, not because some protection things.
I actually tried this method several times. I first tried with 1 file to short times and just to see if the PS3 would recognize the files like an installation. Every time the game starts it look up for the files, if any isn't there, it install those that are missing. I know it because if I cancel the installation at any point, it does not starts from 0, but from the most closest file.
Also, I thought the same as you, that because there was only 1 file it is starting from. So yesterday I decided to create another backup with all the files you told. The PS3 recognize it, but the game doesn't.
Цитатаarchicharmer ()
And where is the patch - BLUS31156?!?..
It wasn't in that backup, but I placed it in another backup. The PS3 recognize it like a game installed on the HDD, rather than the disc game updates.
Цитатаarchicharmer ()
Anyway, here is the structure "like the one you share in PasteBin":
Thanks! Just 1 question. That structure is the one in your PS3, and the game is installed and up to date? I ask because the 21 game updates are something close to 2.3gb, so, I am not sure how should I extract if every update have the same files.
So yesterday I decided to create another backup with all the files you told. The PS3 recognize it, but the game doesn't.
If GTA5 is continuing the install - not starts the installation from the beginning - then your shot is right - your GameID is BLUS31156. Next question you may identify as a supid - the .rpf files you placed - are they a real files from the GTA5 games or they are the fakes? I mean, maybe you experimented with the files and placed some another files with same file names?.. Check the MD5 checksums:
- if any file has another MD5 checksum - PS3 will reinstall it.
Цитатаmontcer9012
The PS3 recognize it like a game installed on the HDD, rather than the disc game updates.
That's strange... There should be "GD Game Data" Category set in PARAM.SFO in BLUS31156 directory. However, I do not know how the internal BLUS31156 GTA5 version looks like if it is launching from internal HDD. If the 20Gb game is placed to /dev_hdd0/game/BLUS31156 - then you can't inject the files from the patch because it has the file - EBOOT.BIN - which is already inside the protected part of backup. Well, the patch is not problem for OFW - it can always be downloaded automatically from the internet right from the PS3 itself.
Цитатаmontcer9012
That structure is the one in your PS3, and the game is installed and up to date?
Untranslatable a little, but yes. Except the place where I have BLUS31156 20Gb BD disc copy prepared to use it on CFW. Also, I updated it by myself, not by connecting the ethernet cable, entering the game and downloading it from intrernet.
So, I think you should check the MD5 summ of the files.rpf you are placing to your backup. If all of them are correct... then I do not know what to do next. But if one of them is not - you should download that file from internet. However, almost every part.rpf file size is about 2Gb... PS4 CUH-1108A OFW 5.05 + VR CUH-ZVR2 PS3 SuperSlim CECH-4208a OFW v4.50 Cobra ODE PS2 SCPH-77008a SLIM чиповка; припаян YPbPr - компонент PS2 SCPH-55004 FAT чиповка + orig SCPH-10281 Network Adapter SATA mod
If GTA5 is continuing the install - not starts the installation from the beginning - then your shot is right - your GameID is BLUS31156.
My GameID is BLUS31156. My saves folder from that game have that region in their name, and so it reads from the game box. However, it does NOT continue the installation and now I think why it is happening. In my GameDataUtility under the XMB, there are 2 GTA5 sets after I installed the game: 1- states "GRAND THEFT AUTO V - CONTENT" whose size is 20kb. 2- states "GRAND THEFT AUTO V - INSTALL" whose size is 8487mb.
According to that, there are more files in the BLUS31156 folder that we created. Also, we are placing there the content of the update 1.26 without the content of the other 20 updates. I think I just need to copy there ICON0, PARAM and PS3LOGO, as the 3 of them sums 24.3kb in NTFS, not sure how if that may change in FAT32. Anyway, I am going to try that and will comment the results.
RESULTS: No, no luck. Also, I tried with the files of the very first update, the difference is that the GameData now appears as it, GameData, not like a HDD game.
Цитатаarchicharmer ()
Check the MD5 checksums:
Done! Same files.
Добавлено (13 Ноя 2016, 07:40) --------------------------------------------- Well, I need help.
I think that I have to place in the same folder ICON0, PARAM and PS3LOGO, however, I don't which versions to put in there. Obviously these should be the versions that are in the BD as I have not download anything, but the BD I downloaded is BLES, not BLUS
RESULTS: I noticed that the version does not matter as they are replaced everytime that the game is updated. So, even with latest update, the game does not recognize the installed files.
Добавлено (13 Ноя 2016, 07:51) --------------------------------------------- Ah! By the way, I keep trying the inject method as you recommend, but the Ps3xploit version I was using keeps giving the same error, so I downloaded an older one, and the problem was fixed! However, once the backup was created and restored, the PS3 does not show up the gameInstallation in GameDataUtility, but under SystemInfo, the data usage in the HDD was high... So obviously the files were there!
I started the PS3 in secure mode, rebuild the system files, and voila! The InstallFiles were there, and the BLUSXXX folder still shows as an HDD game, but this time, as a corrupted one.
Добавлено (13 Ноя 2016, 17:45) --------------------------------------------- Well, now I think that the problem is the file param.sfo placed within the install folder. I assume this because if I install the game, backup the data and then restore that data, the game knows that there are files installed, but it just doesn't work for the files I place there, so...
Сообщение отредактировал montcer9012 - Вс, 13 Ноя 2016, 17:43
the problem is the file param.sfo placed within the install folder. I assume this because if I install the game, backup the data and then restore that data, the game knows that there are files installed
The game is not so smart as you assume) I think that you just have a corrupted HDD:
Цитатаmontcer9012
the BLUSXXX folder still shows as an HDD game, but this time, as a corrupted one.
- if you placed all the files from the patch.pkg unpacked - then you should have the files in Game Data only and not as a HDD Game.
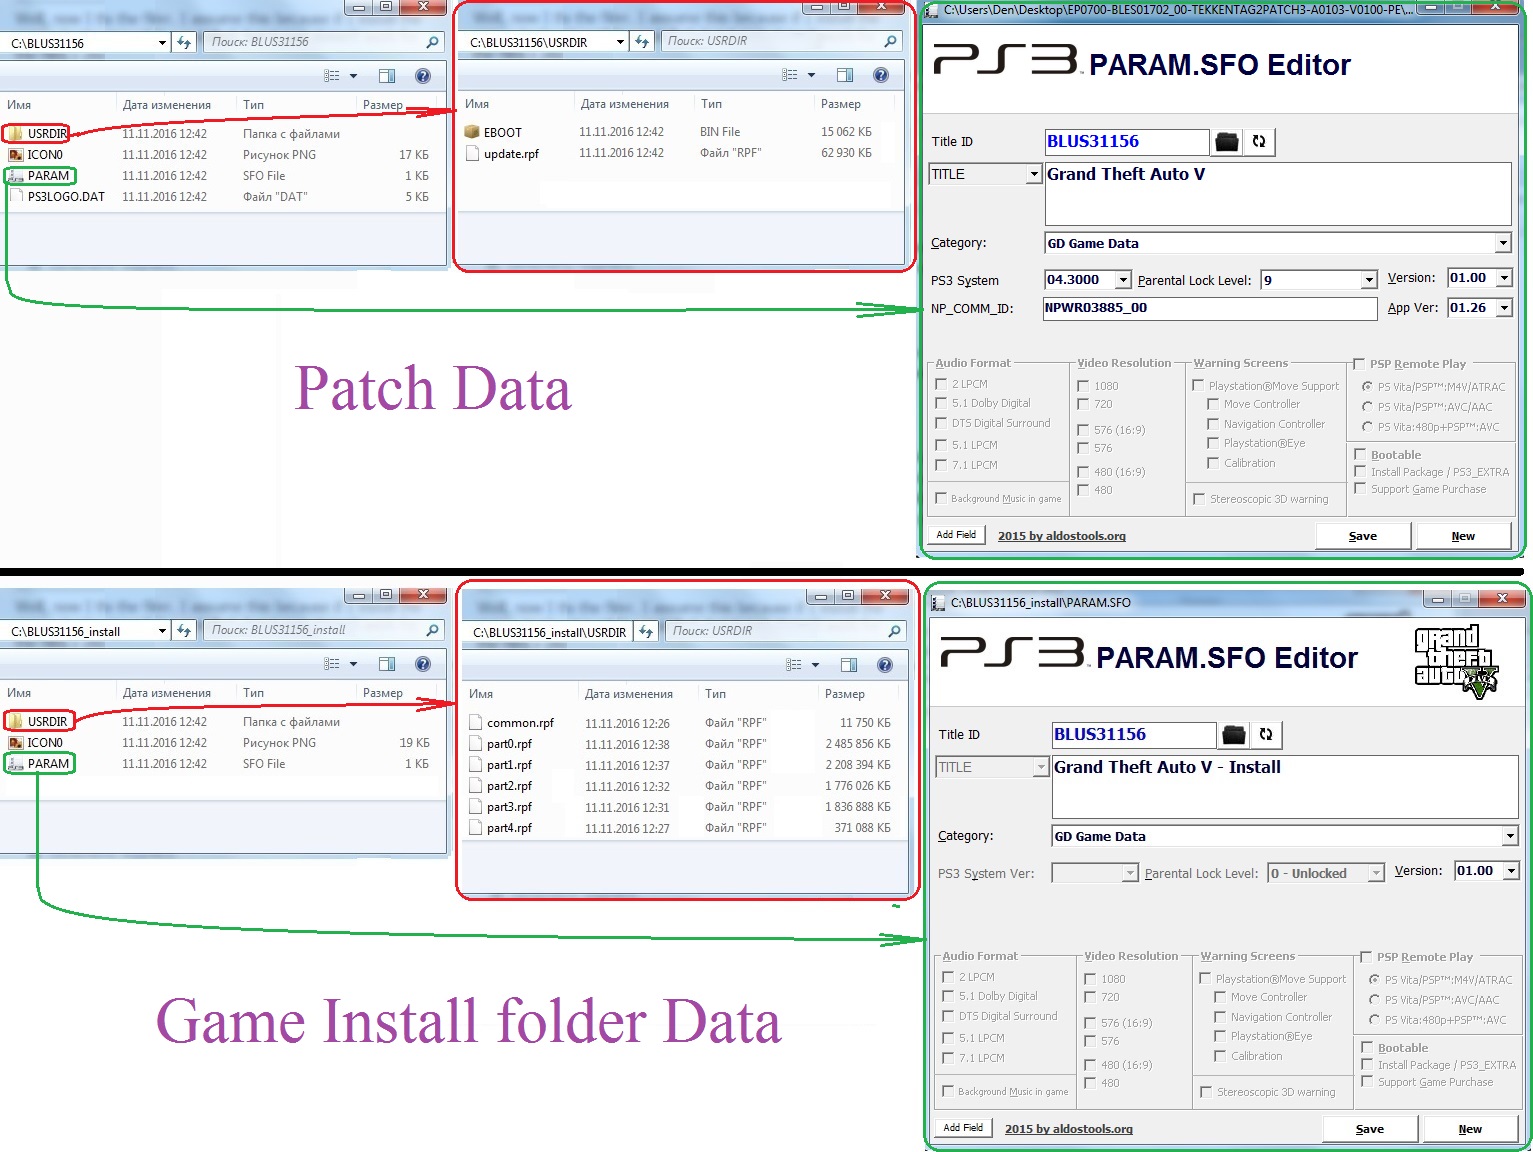
I prepared an image of the structure and PARAM.SFOs.
Here the PARAM.SFO from Patch Data is of a cummulative type - if you want all patches in one /dev_hdd0/game/BLUS31156 directory - download this PARAM.SFO. But be careful! There might be a pontential danger to be banned with this PARAM.SFO if you'll playing GTA5 with internet connection on. Better DO NOT INJECT the patch files to your backup at all - let the game download the patches from the internet by itself.
The picture of what is /dev_hdd0/game/BLUS31156/USRDIR includes is not cummulative thought - it is just what the last v1.26 patch includes in that directory.
As for your current situation... I do not know what to advice to you know.
Is /dev_hdd0/game/BLUS31156_install/PARAM.SFO from the picture and your one are identical?
And tell me - when you made the backup with all files in /dev_hdd0/game/BLUS31156_install and restored it to your PS3 - from which KB the game is starting the file copying? You was writting about some percents but there is no percents - there is a [ current Kb / total Kb ] progress.



















 так что я с Венесуэлой на одном уровне