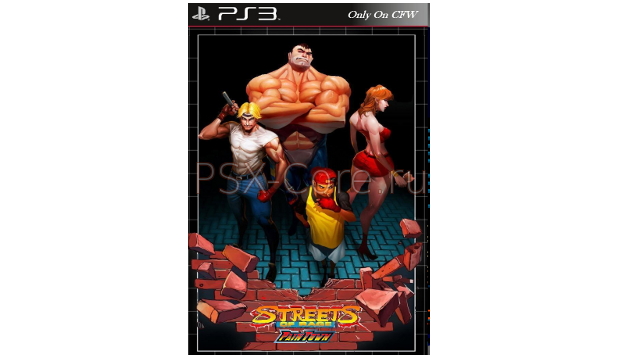
Streets Of Rage Paintown: v0.9.8 + Streets of Rage 4 Demo
Цитата
Changelog-- v0.9.8: - Added the demo of Street Of Rage 4 developed by Zhang Qiang and Allan.Cylakes - Added destructible items (in test) - Bug fixes his / Graphic - Modification / total replacement of sprites Adam - Modification of some sprites Axel - Corrections orders for Skate - Improving certain stage
Status of characters: - Axel 100% - Blaze 100% - Adam 90% - Skate 60% - Max 100% - DrZan 100%
- Well, it's done in the git, new_core has changes. - sm.self already compiled. - with patches to CFW 4.70 (I advise prudence someone more expert to try it first).
How does it work? So basically when the temperature changes instead of setting the value directly it reaches the target speed from wherever you are in a series of steps. sysUsleep as the loop is 400 ms, that means a step forward every 400 ms. There is an internal counter that counts to 5 and at position 1 makes the temperature reading and tries to adjust steps in relation to the tables and no one moves every turn. If this I want to play, look to it yourselves . In principle, it is matched up to a maximum of 5 steps, but as a decimal precision is lost, there may be more, of course. Anyway, I try it and see if you like best. And no, I have not . It's just that one day is a day as a forum people get around a theme and no one program, the thing comes to nothing and less . So there you have a variant.
EDIT: You can try from the Iris own to make a jump something great temperatures to be enough to return to the lower limit and see how it behaves if you want to make the most progressive leap with. Add number of steps or make adjustment step by step with a lower frequency of 400 ms (adding a counter that makes setting one in two or more cycles) to see what you like best. To me as it is, that's fine. Greetings.
PS3 GameInv v1.0.25 и VideoInv v1.0.8 от SubZero Dezigns
Цитата
SubZero DeZigns brings you: GameInv - v1.0.25 This is just a simple Game Database.
Functions: Add New Entry Add List Entries Add Advanced Entries Advanced notepad Notes Edit Opacity - Main Web based Info viewer Front Cover Back Cover Jacket Cover Wallpaper Many others and more to come
Images: Front Cover - images/front/BLUS00000.jpg Back Cover - images/back/BLUS00000.jpg Jacket Cover - images/cover/BLUS00000.jpg Wallpaper - images/background/BLUS00000.jpg All images are loaded with the Game ID via: ID from the Entry Default images can be replaced. BUT! They must remain the same names. All entries have a replace_(NAME) entry. Thus this will give way for possible own style CCS's - Todo list
SubZero DeZigns brings you: VideoInv - v1.0.8 This is just a simple Video Database.
Functions: Add New Entry Move Entry Copy Entry Advanced notepad Notes Edit Opacity - Main Web based Info viewer Front Cover Wallpaper Many others and more to come
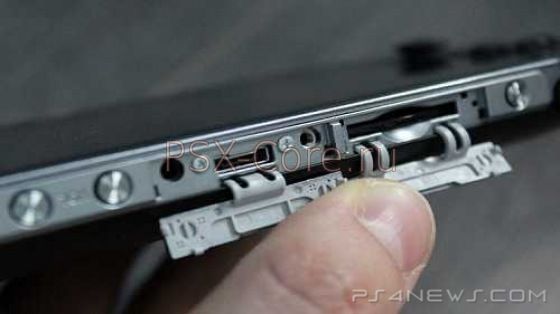
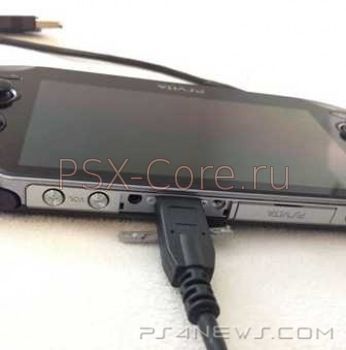
на 1k моделях был загадочный порт, рядом со слотом картриджа.
PCH-1000, PCH-1001, PCH-1002, PCH-1003, PCH-1004, PTEL-1000, PTEL-1001, PTEL-1002, PTEL-1003, PTEL-1004, PDEL-1001, PDEL-1002, PDEL-1003, PDEL-1004 (Retail, Testing Kit and Development Kit/Prototype)
Так вот оказывается кабель от определенных моделей Panasonic Lumix замечательно подходит для работы с этим портом и можно получить через него доступ к консоли и синхронизировать данные.
This method is reported to brick PS4's on 2.51 Firmware. Not responsible for ANY DAMAGE CAUSED TO YOUR PS4, do any procedure below for your OWN RISK! Only provide the tutorial, we are not suppliers! image: https://www.ps4news.com/forums/images/smilies/icon4.png
Materials Needed:
1x Raspberry Pi (You easily find on eBay, and in some stores) 1x 4GB Memory Card PS4 1x Serial Flash MX25L25635FMI-10G (see PS4 Macronix MX25L25635FMI-10G & MX25L1006E NOR Flash Dumped and PS4 NOR Flash Dump MX25L25635FMI-10G for CXD90025G Arrives and PS4 AC1D Flash Tool Manager GUI by CFWProphet for PlayStation 4 Out) Raspbian Win32 Disk Image Putty Pinout (Connecting the Raspberry Pi - see PS4 NOR Chip Dumping Process Documentation by AlphaHack)
Note: The technical part of the connection will publish soon.
Installation
Installing Raspbian
Turn the win32diskimage
1 - In "Image file" select the image Raspbian that you downloaded. 2 - In "Device" select the drive that is your SD card. 3 - Click on "Write" to start the recording process.
After finishing the process, put the SD card into the Raspberry Pi and connect it using a USB cable.
Remote Shell in Raspbian Two minutes after starting the Raspberry Pi, turn the Putty.
1 - In the Host Name put: raspberrypi. If you do not work correctly, go to the settings of your router, and find the IP of the Raspberry Pi. 2 - Select SSH 3 - Select Open
Installing the application
He will request the login place "pi" to the user and "raspberry" for the password.
Note: For additional information about JaiCraB's developments, refer to JaiSpiMod: JaiSpiMod.hex for Teensy++ 2.0 PS4 Development by JaiCraB and JAISPI V1.0 Arrives, Read / Write PS4 MX25L25635 Memory by JaiCraB.
Enter the following commands:
[Ссылка в источнике]
Full installation. Place Putty to access the Raspberry Pi. To run the command jaispi you will have to ask root access (sudo -s)
[Ссылка в источнике]
Options:
[Ссылка в источнике]
Get the ID: -i: Displays information about the flash.
[Ссылка в источнике]
Reading: -r: Makes a full dump of the flash (It takes about 35 sec)
[Ссылка в источнике]
Delete: -e: Clean all the flash (It takes around 1min 30sec and)
[Ссылка в источнике]
Record: -p: Records in flash only the sectors with change (It takes around 1min 30sec and)
[Ссылка в источнике]
Check: -v: Compares the flash content to file (It takes around 35seg)
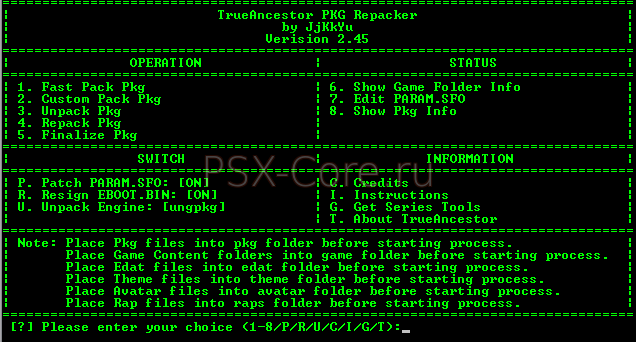
Разработчик с ником jjkkyu, известный по таким программам как TrueAncestor SELF Resigner и др., анонсирвоал переработанную программу - свой PKG Creator - теперь уже с названием TrueAncestor PKG Repacker.
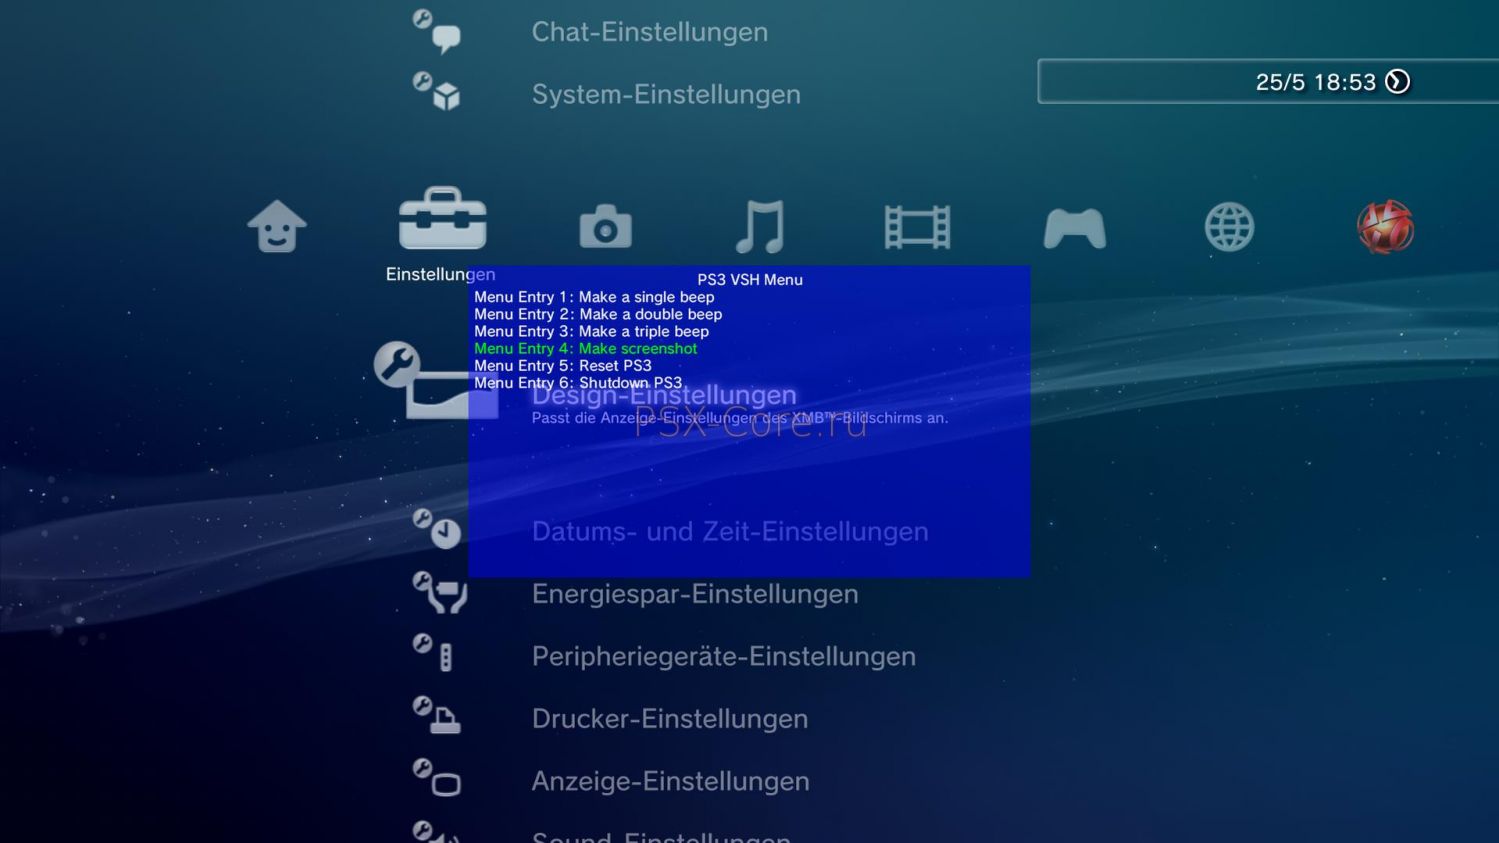
So I try it again and here is the result: PS3 VSH Menu + src
I give usually a shit on "eye candy" graphics, things have to work, how she looks is secondary. Anyway, there is a function, draw_png(), to blitt a part of a loaded png on a given place. So a menu bitmap with background, buttons, ... can be created+used to make "eye candy" graphics. Alpha blending is available, for things like rounded edges or light effects.
The file font.png must be placed in /dev_usb000. @Mod ders, make no changes to this file, there are hidden pixels containing information about char-width!
The screenshot.bmp created with menu entry 4 is placed in /dev_hdd0, there is no id into the name like a timestamp, so a new file kills the old one.
Coded under rebug 4.46 CEX, but code should be generic.
THX to MixeryM@xe for help and testings, and @mysis for the idea last year: "why not freezing the framebuffer"
PS3LOCK V0.2 BY MIXERYM@XE - защита паролем вашей PS3 от несанкционированного доступа
Цитата
After my POC "password" protection for the PS3 ( Google Translation) , I decided to create my own PS3 plugin and publish it.
PS3Lock v0.2 (currently only CFW 4:46) This plugin equips your PlayStation 3 from a authentication system. It enables you to protect your PS3 against unauthorized access. There are 2 ways to do this are the functions: Authentication is ENABLED Authentication LIMITED Authentication DISABLED
Authentication is ENABLED: Without authentication, the PS3, immediately shut down again with a warning sign. It has absolutely no access to the PS3 system.
Authentication LIMITED: Without authentication "system update", "System Settings" and "Network Settings" locked. PS3 to remain and can be used otherwise normal.
Authentication DISABLED: PS3 starts normally with full access to all settings.
Settings and functions: The setting is at " R3 + START + TRIANGLE " In XMB and in-game XMB, enabled or disabled.
1 authentication is enabled: - Without authentication runs the PS3, with a warning, immediately under Mr.
2 authentication regions: - Without authentication system update, system settings, and network settings - Locked.
3 authentication DISABLED: - PS3 starts normally with full access.
When the plugin is installed and enabled has 2 ways to sign in each Authenticate restart.
1 Use the key combo " R3 + START + CIRCLE ". (Press and hold at the start of the PS3) - It is sufficient if you pressed the combo from the Cold Boot (PS3 logo) for about 5 seconds - Holding up an info "Authenticated", top right of the screen appears.
2 via a "password file" on disk. (Needs the PS3 launch in "/ dev_usb000" stuck) - To create this password file, you need a USB stick or an external hard drive - In FAT32 format.
- On this disk has a flag file "ps3.lock" created (eg a new - Create a text file and "New Textdokument.txt" in "ps3.lock" rename).
- USB disk with flag file in "/ dev_usb000" (far right) and turn the plug with the - Key Combo " R3 + START + TRIANGLE Password file "ENABLE. The" "is created and - The "ps3.lock" deleted. It appears an info "password file created".
Installation: INSTALL: !!! For the restricted mode 5 files are installed "dev_flash" !!! !!! It will overwrite any files !!!
. 1 - Ps3lock.sprx and boot_plugins.txt after "/ dev_hdd0" Copy. - Should the boot_plugins.txt already exist then the following line must be added:
/dev_hdd0/ps3lock.sprx
. 2 - Copy the flag file "ps3lock.install" and the folder "ps3lock_install" on a USB - Disk in FAT32 format.
. 3 - Plug USB disk into "/ dev_usb000" (far right) and PS3 reboot.
When you start the plugin files are installed and the erfordenlichen from USB Disk deleted.